Wednesday, February 5, 2014

Grampa's birthday...


On February 2nd we celebrated Grampa Gary's 58th birthday. The day before Jordy and Isaiah came over to help. They were so excited! They set a beautiful table on the "big special table", using the "special dishes and silver ware", and made handwritten place cards. Jordy wrote most of them and Isaiah wrote his. Then they decided were everyone would sit.

Then we made three cakes; two heart shaped cakes which they got to decorate however they wanted to, and an Apple logo shaped apple cake which was served with freshly whipped cream.

With that said, most people that know me very well know I'm not a big sweets eater. Don't get me wrong, I love certain items, like my sister's Rocky Road, my cousin Trish's iced sugar cookies (the best I've ever tasted!), a great piece of homemade pie, and a small chunk of very dark chocolate. But otherwise I'm not much interested. A Kripsy Kreme donut will give me such shivers I can hardly even look at one let alone eat it.
But I do have a favorite cake, and it's this Buttery Apple Cake. It's moist, fruity with tart Granny Smith apple, and just a nice light dessert. Here's the recipe: And, if you don't own a springform pan, get one! I'm not into having all kinds of gadgets but a springform  pan is one of the most useful items I own.

Buttery Apple Cake 
The cake:
3/4 cup flour                                                                   Preheat oven to 325 degrees.
1# Granny Smith Apples, peeled and                             Grease & flour a springform pan.
         shredded on a box grater (about 2 cups)                Place on a rimmed baking sheet.
1/2 cup sugar                                                               Spread apples in pan and set aside.
1 1/2 tsp. baking powder                                          Whisk together rest of ingredients
1/4 tsp. salt                                                                         pour over apples.
6 Tbs. milk                                                                Bake until set and pale golden brown,
1/4 cup oil                                                                             about 40 minutes.
2 large eggs

For topping:                                                                  For topping stir together butter,
6 Tbs. softened butter                                                       sugar, salt, and vanilla.
1/3 cup sugar                                                                Remove cake from oven and pour
1 large lightly beaten egg                                                 topping over the cake.
1 tsp. vanilla                                                                  Bake until golden brown, 
                                                                                          about 25 minutes.
Whipped Cream (if desired):                                         Cool completely BEFORE removing
1 cup whipping cream                                                         springform ring.
1/4 cup sugar                                                      Cut in wedges and serve with whipped
1 tsp vanilla or almond extract                                           cream.

                                       This cake is SO delicious! It’s really more like a baked apple                
                                         torte. Not super sweet...very dense and satisfying...
                                                especially with home made whipped cream!


Thursday, January 30, 2014

Hooch!

We make a lacto-fermented probiotic drink called Hindu Lemonade (fondly dubbed, "Hooch" by my niece, Leddy!) to mix with our continuous brew kombucha. The two combined give us a broader range of beneficial bacteria. The "hooch" also smoothes out the more vinegary taste of the kombucha, although our kombucha is pretty smooth tasting already. The Hindu Lemonade is generally made with lemons and limes, but can be made with other fruits or flavors.

We have a tradition in our family that was handed down from my mom, fondly known as Gramma D., and it is a tradition that I have always found meaningful for some reason. Instead of the normal oranges that some put in Christmas stockings we always got tangerines instead. Mom always told me it was because tangerines, at least when we were growing up, we're easier to come by and cheaper than expensive Florida oranges. I liked the idea not only because it reminds me of my childhood, but also because tangerines seem more rustic and homey to me...kind of the smaller, ugly duckling of the citrus realm...something I always felt in my own growing up realm as well. Also, I have somewhat of an allergy to oranges...not serious, my body just does not do well on them. Surprisingly though, I can tolerate tangerines to a point, where I can't oranges.

This past Christmas we needed a batch of hooch and all I had was one lemon, a few limes and a handful of tangerines floating around the house, so I tried making hooch using the tangerines. Well, we loved it! Now we plan to use them regularly. Here's the recipe, quick and easy, if anyone is I terested in trying this super simple probiotic beverage. Milder that kombucha it makes a good transitional phase to get more probiotics into kids.

For a 2 quart jar (we do 2-3 jars at once) juice a lemon or two, 3 or 4 limes, and 3 or 4 tangerines. Mix juice with 1/3 cup of natural cane sugar or Sucanat, 1/2 whey and 1/2 tsp. of nutmeg. Fill the jar
the rest of the way with fresh water. Set on the counter or table with the lid on loosely (to allow gases to escape) for 3 days, then refrigerate. You can begin to drink it immediately but it deepens and
improves in flavor as it sits longer so don't afraid to make several jars at once. After about a month it 
is heavenly!

Wednesday, January 29, 2014

Oven Chicken Broth


Anyone who reads here knows that I am an avid broth/stock maker, often having huge pots of broth or a crock pot of bones simmering away on my stove and counter, sometimes for days. So...what IS the difference between stock and broth? OH! Don't even go there! Seriously! For every world famous chef who gives their definitive definition there is an opposing one who argues just as vehemently for their own understanding! For me, I think it's silly to argue about. My thought is something like this, and it's rather British in nature, stock is the long cooked thing we generally in the real food movement call "bone broth", and broth is a flavored stock after you have dressed it all up with your savories and herbs.

Most of the time when I am making broth I am making it with the idea of freezing the finished product for ongoing use, but at times I am simply cooking a chicken for single meal use, such as the chicken and biscuits I'm making for family dinner tonight, and I make what I refer to as Oven Broth. I  made this up yesterday and thought I'd give it a quick word of instruction.

Place your thawed chicken in a deep pot that will take a tight fitting cover, like this Lodge Cast Iron pot, having sprinkled the carcass liberally with salt and pepper, and slathered the top with butter. Place in along the sides a couple of chunked up carrots, several stalks of celery, and a medium sized sliced onion. Toss in two bay leaves, a small handful of peppercorns and good salt, and then fill the pot with fresh, cold water up to about half way. Put the lid on and let it slow roast away in a 275 degree oven throughout the whole day.

This is what it looked like after cooking for about 6 to 7 hours; aromatic and falling off the bone. After it had cooled for an hour or so I simply strained the broth, collected the meat off the bones ready for the next day, and put it all in the frig.

Of course the bones where stuck in the freezer stock bags for future use in a large pot of stock.

Easy, and ready to make your meal.

Tuesday, January 28, 2014

Remineralizing Toothpaste

Recently it seems like many of our family members have been struggling with the dilemma of dentistry, and the push to constantly indulge in more and more intensive, intrusive dentistry methods that cost a fortune and don't seem to make your mouth any healthier, rather than addressing the root causes of tooth and gum issues, and using some natural means to help that process along.

Among the things people are told is that tooth decay never heals itself, and that teeth cannot be remineralized. All lies! There are people out there healing tooth decay, or at the least slowing it to a stop, and avoiding many painful, expensive procedures.

Last week I came across this article from thepaleomama, and decided to give this toothpaste a try. We have tried several different recipes, which I have done really well with and actually like the taste of. But when you are dealing with kids the issue of taste becomes more crucial. I can honestly say that no matter how this toothpaste looks...basically like clay!...it tastes good. And because of the coconut oil it also does not taste gritty. If you ever wanted your children to accept a DIY toothpaste from a young age this would be one to try. It is pleasant tasting due to the stevia, mint and (good) spicy Thieves, and it left my mouth and gums feeling great. The ingredients may require some initial purchasing for some but once bought would make quite a lot of batches of toothpaste.

So, try it out, and check out the original post from PaleoMama for more of an explanation.


http://thepaleomama.com/2013/12/diy-remineralizing-toothpaste/

Monday, January 27, 2014

Monday morning musings...

Right now we are experiencing a surprise squall/blizzard of sorts. It is moving through the area with warnings of its potential to restrict visibility for the next hour or two. As I gaze out through my morning-nest window I am contemplating the immense value of warmth. It has been a bitterly cold winter with very little reprieve in the cold temperatures. Tonight and tomorrow we are warned of minus numbers with a wind chill as lows as as 20 below. In Wisconsin where we have family they are talking wind chills as low as -50! That is cold! One day last week I ran out quickly to start Ruby and by the time I came back in 30-45 seconds later my freshly washed hair was frozen to my head and my skin felt like it was burning!

Yes, it is a cold winter. A winter like I remember from my youth when we had cold temperatures like this regularly, as well as consistently heavy snow. I admit to being extremely tired of this winter already, and it's not even February yet. I want to run away to somewhere warm and feel soft breezes on my skin. And I'm not a winter hater! This one has just been especially stressful and wearing on me. Can you take away an understanding of my state of mind from my new blog design? My questing soul stretching out for softness and harmony? For green?

But one thing this winter has done is made me think about how wonderful the reality of warmth is. It seems almost impossible to me, how it could be so cold outside, yet we have managed to figure out how to stay toasty warm inside. How thin a shell separates us from the frigid atmosphere just inches away. How quickly our little abodes would plummet if our heat stopped. But it doesn't! We survive because we have learned how to, and I am very thankful for that today. Thankful that I can sit quietly drinking my morning coffee and watch, among all our regulars, a flock of goldfinches that have come for sustenance this morning. Thankful that I can sit here at my computer writing this. That I can make soup, bake bread, fold clothes and make my bed. And I can do it all warm. Yes, warmth is a marvelous thing.

Thursday, December 26, 2013

Christmas Sewing Projects...

I don't do much posting these days. My this past year's goal has been to be far less dependent on feeling like I need to let other people know everything I'm doing on a daily basis. But I do want to show my sewing projects from this year for anyone interested.

This  is "Bright Squares", a little floor quilt I made for Luna. What I mean by floor quilt is that I thought it would be a bright colorful pattern a baby would like to lay on and play. I saw a similar pattern in a magazine and adapted it to my own design. The front is cotton, the batting, "Cream Rose", an all cotton batting, and the backing is a pale yellow cotton flannel. It is machine quilted in various patterns on the different color panels.


 "JBird Frenzy" was actually Josie's third year birthday quilt. Abbie showed me a quilt and color scheme she liked and I designed from there. It is made with all cotton fabrics, Cream Rose batting, and a premium cotton fabric on the back with tiny birds on it. She loved it.


These are some aprons I made. Jordy requested a "big girl like Aunt Sara" apron, the red and pink fabric. Isaiah got a blue check waterproof apron because he LOVES helping with dishes but gets pretty soaked. Previously I had wrapped a plastic bag around his middle underneath his cloth apron. I think he'll like this much better! The other two are lookalikes made for Abbie and Josie out of vintage dish towels, replete with rickrack!


Next up are two quilts I whipped up for Jamie and Hunter. Jamie wanted a lap quilt. Many people don't realize that Jamie works at GE Railcar in unheated spaces for the most part and comes home pretty frozen. I hope this warms him up. There is a pillow with a wolf on it that goes with it. Hunter's quilt has a fishing/outdoor theme. He basically just needed a warm blanket for his bed. Both quilts have cotton tops, warm polyfill batting, and fleece backs.


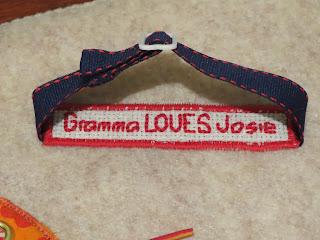
This is an activity board I made for Josie. I had made her one a couple of years ago and Abbie suggested that an updated one designed to teach her some handy new skills would be a great gift adea.  It has a shoe on one side with an attached lace that can be undone and laced back up, as well as tied. Along the side is a row of wooden spools to thread a lace through. The other side sports a separating zippered jacket with a button down shirt underneath. And of course it must have the prerequisite label reading, "Gramma LOVES Josie!" underneath another little clip attachment to practice on. It is made with a neutral colored felt fabric over craft board, and the designs are appliquéd and stitched down onto the felt.


This is a hand sewn doll I made for Moon Baby (Luna). It has a soft wool yarn ball head and hands, loosely rolled. The "skin" fabric is from a recycled merino wool sweater. The stuffing for the body is simply the extra fabric that hung down from the head and hood portion, and it has a little pouch of tiny bells encased inside the body. The outside is an extremely soft fleece type fabric in pale yellow. The face is embroidered on.


And last but not least is "Primitive Stars". This is a quilt design Kelly asked me to make for her earlier in the year that she wanted pay for. I suggested I just make it for her for Christmas and she liked that idea. It was pretty interesting to make due to the added issues of using appliqué for the stars, as well as sewing numerous curves into the pattern. It went really well though and I think it turned out great. I believe in always giving credit where credit is due...it's only right and fair...so when I was trying to decide what color to go with for the backing Abbie suggested that the burgundy would make the whole thing "pop", and I'm glad I listened. It really does. The addition of my favorite dark red fabric as the border brought the whole design out even more. I was pretty pleased with it, and extremely pleased to put the last tie in and be done with Christmas sewing! "Primitive Stars" has an all cotton top, warm poly fill batting, and is backed with strong egyptian cotton. (And yes, those ARE beautiful, fat snowflakes dancing across the surface on Christmas Eve!)


Now to start on next year's projects!!! Yes to your question, I do indeed have most of them already planned!

Saturday, July 20, 2013

The HideyHo Project...


   Okay, so for anyone interested in the HideyHo Project, the "getting on the road of my old 1965 Shasta Compact travel trailer", here's what's happening so far. The outside of the camper is yet to come, but I have brand new rims and tires all ready to put on after Jamie greases up the wheel bearings. 

   My easy-peasy, cheap as dirt awning turned out very well. I bought a decent quality 8x10 white tarp, cut the 10' end to make it more 8x8, enclosed (sewed) an old piece of clothes line rope like a piping onto the trailer side, and coated it with silicone to seal the seams. Then I slid it through the awning rail slick as you please, and used three good telescoping tent poles I already had to complete the awning. The ends of the awning have a length of rope left long on each side which can be attached to an extra guy line to anchor it down in windy conditions. Pretty nice!

Following are some photos of the inside. I love it! It's very cozy looking, and feeling.

the Bedroom - I've used my Summer Solstice lightweight quilt - perfect coloring.

the Living/Dining Room

overhead shelves with various non-tip-over baskets for storage

I hope you didn't fail to notice my totally cool new pillows I made, including the Duluth, with fold-over flap and silver western buttons! I adore the floral fabric of the one pillow. That is my signature fabric for the project.
new frig.

the Kitchen


my new appliances

various storage hooks and shelves
brand new Luggable Loo in the "bathroom/closet"!


cupboard and new pot holders
Tim's old shelf he made fit perfectly where the stove and heater used to be.
storage over frig.